After looking into Notre Dame offensive coordinator Tommy Rees’ approach for the Florida State game, we decided to break down both Clemson games from this year.
This article covers the first game through regulation. We’ll dive into the two overtime periods next.
In the first half, you can see Rees made a concerted effort to focus on the run game, racking up 174 yards on 20 carries, out of 37 first half snaps.
While the Irish had a huge defensive touchdown, the 23-13 halftime lead could have been more, given the fact that two otherwise dominating drives stalled at the 7 and 10 yard-lines respectively, forcing the Irish to settle for a pair of field goals.
In the second half, as the Tigers started to mount a comeback and even take the lead at one point, it seemed Rees might have gotten away from the plan a bit. Rees dialed up some runs early in the second half and had some success, even though it did not completely pay off with an Ian Book fumble into the endzone on the second possession after halftime. But excluding the initial two series of the third quarter, Notre Dame only ran the ball 9 times out of 24 total second-half plays.
With Clemson missing three key defenders in their front (DT - Tyler Davis, LB Mike Jones Jr, and especially MLB captain James Skalski), the plan to run the football early and often made complete sense. While throwing the football in the second half was not all bad and did bring them to overtime and eventually a win over the then-#1 team in the country.
We’ll look into some of the pass ideas that paid off in a minute, but let’s start by examining the run game right out of the gate, highlighted by this 65-yard scamper by Kyren Williams on the second play from scrimmage.
This is an interesting call early in the game versus this defensive front. Clemson is lined up in what is referred to as a “Tight Front,” made famous by Iowa State over the last decade. This is a little different from the Cyclones though, as they are not in playing a dime package with three high safeties. However, the front is still the same. Clearly, this is just a basic outside zone play...so what makes it an interesting call? Tight fronts are made to combat zone runs and here is why.
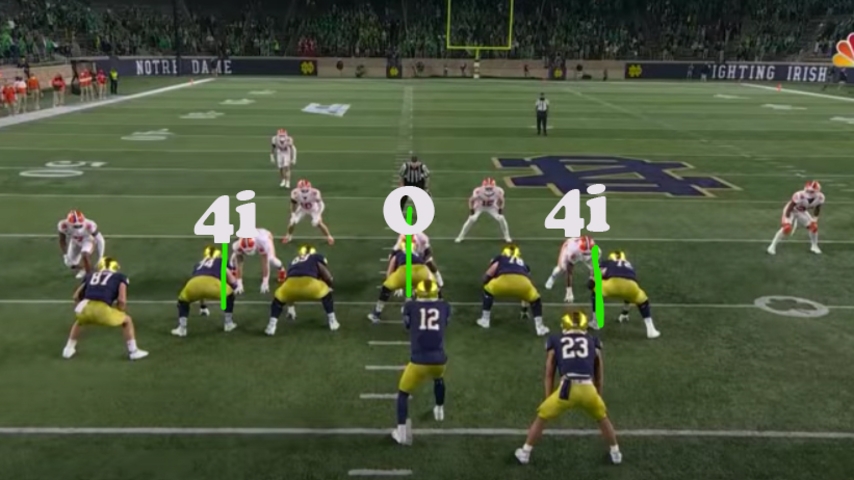
Here, you can see the key to the “tight” front is the techniques of the DL in this Odd (3 down/Nose Guard Defense). The nose is lined up in an “O” technique or head-up on the center and the two DT’s are lined up in 4i’s, or the inside shade of the tackles. The reason tight defense is usually a “zone-stopper” or at least tough to run versus a tight front is the backside 4i. As you can see from the picture above, the DT has a playside leverage advantage on the RT, tough even for a big athletic stud tackle like Robert Hainsey. Here, I’ll illustrate how Clemson made a critical mistake that the Irish capitalized on.
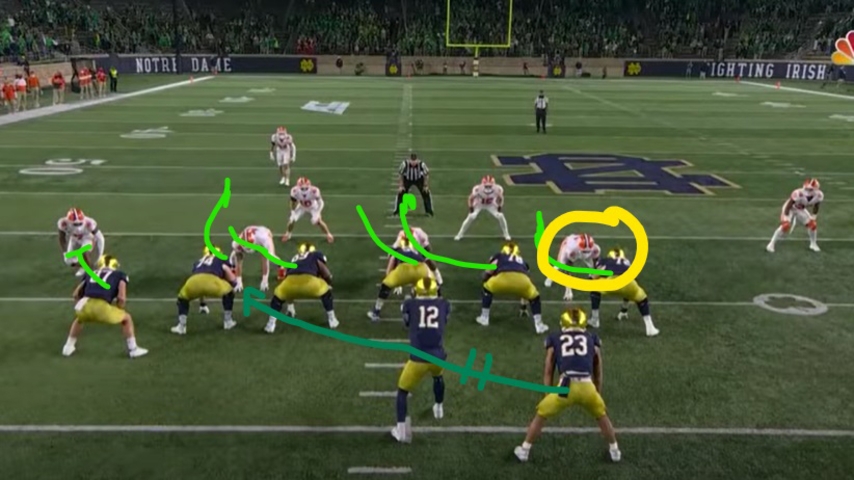
As you can see here above, the backside DT is the problem on this play, based on the blocking assignments drawn, but here is where Clemson went wrong.

In yellow, you can see that the Clemson defense stunted towards the tailback. Therefore, they completely lost the leverage advantage they gain in the “Tight” front versus outside zone away from it. While there is no way of knowing exactly why Tiger DC Brent Venables slanted towards the tailback on this play, my best guess is it had nothing to do with the tailback at all, and rather was a call to work away from the TE. If you read the last piece on Rees’ gameplan in the FSU game, it was a common theme for the Irish to attack away from where the H-back lined up (see - G/T counter and split zone). This defense allowed Williams to get a big gain, but it was the way the Irish handled Clemson’s secondary, coupled with just enough of a block from WR, Javon McKinley, that sprung the run for a touchdown.
Clemson lined up in Quarters (Cover 4) to the field side and Cover 2 to the boundary side, for what is generally referred to as Cover 6 (4+2 = 6). Typically, in Cover 2, it is CB run support to that side and in Cover 4, it is safety run support. This is why you see the safety to the field for the Tigers play flat-footed and not as deep as the Cover 2 safety and you see the CB to the field “off” the WR.
Conversely, you see the CB closer to the WR to the boundary side and the safety deeper and in a back-pedal demeanor, even before the ball is snapped. You can see McKinley is coached up using the same secondary clues just explained when it comes to who to block. He comes off the ball thinking he has a safety run support secondary to his side (Cover 4), but quickly realizes that the safety is back-pedaling and his CB does not bail. From here, he astutely turns back and gets just enough on the CB for Williams to be one-on-one with the safety at depth and that is no match for Williams.
Being in Cover 2 to McKinley’s side makes a lot of sense in the pass game, but clearly not so much for the run to that side. Having a “hard CB” or a tighter CB on him to take away quick-game/3-step passes to the boundary and a “high safety” or safety to his near hash that is back-pedaling to take away deep routes is a great pass defense plan for McKinley, when he is the boundary WR.
The reason I felt compelled to spend so much time plunging into this one play is because I really feel it was a game-changer for the way Clemson approached the game the rest of the way. In fact, they only ran this exact coverage one other time and that was a 2nd & 9 versus a “nub” formation (a single width formation with no wideout to one side - think TE and no one outside of him). Clearly, being that it was the second defensive play of the game for Clemson, this was something they game-planned to stop McKinley, that early home run got them out of it.
Even on this play from the Irish’s next possession, Rees notices the Man-Free coverage (man underneath and 1 high Free Safety) and this allows Book to hit McKinley on a back shoulder throw. This is another example of a 10 personnel-looking formation with 11 personnel on the field. In fact, once again Rees did a great job using 10 personnel-looking formations (no TE, H-Back or Wing attached to the formation) with a TE on the field. In this case, it is TE Michael Mayer split out. Rees used 10 personnel-looking formations with at least one TE on the field 30 times out of the 70 offensive plays in regulation.
If you checked out the last breakdown on FSU, we touched on 4 Verticals and particularly the fade with an “outside stem” on a CB who is playing slightly off. This is different because McKinley is facing press man coverage and the general rule of thumb on the fade in this case is, “if the CB is even, throw to the back shoulder.” Oftentimes, commentators and those watching the game think the back shoulder throw is “called” by the OC or QB beforehand. While there may be some rare occasions where this is true, for the most part it is an adjustment to a straight vertical route when the CB is even with the WR.
Here is a great look at Williams with another big blitz pick-up in pass protection and McKinley’s back shoulder catch on a great ball from Book.
This was one of 12 total 4 Vertical calls, out of 29 total drop-back passes in regulation. Interestingly, all 12 were out of some type of trips formation, with 10 of them in “loose” trips (no TE, H-back, etc attached to the formation), 1 formation with an H-back attached and one trips formation that included a TE & wing to the trips side.
Rees was certainly dialed into when they were giving “Man-Free” coverage in trips and called 4-Verts versus this coverage 7 out of the 12 times.
When the Tigers were not in man against trips, their zone consisted of a shell of a 2-High look, with the backside safety keying the strong #3 WR (3rd WR from the outside-in). This coverage has many names, depending on the system. However, the general idea stays the same, which is line up on the weak hash even though there are trips to the other side to protect against weak side run and not leave a void on the weak hash against pass. This is all while protecting against the #3 WR going vertical and still getting covered by the backside safety who has his eyes on him pre-snap, regardless of his alignment.
Here is a great example, where Rees sets the trips to the boundary versus this zone coverage and occupies the “backside” safety to get eyes to that side and as you can see from the yellow highlighted area on the field, leaves McKinley one-on-one with a ton of space to work with to take a shot.
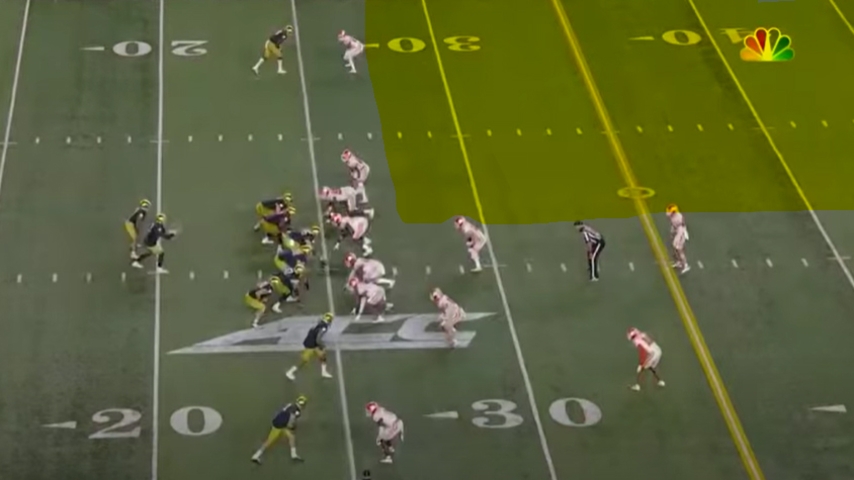
This leads to a 45-yard gain to McKinley with 4:12 left in the 3rd quarter.
While this skinny post was obviously a big play in a tie game, it really was significant for what was perhaps the most critical play in regulation later as it pertains to the how and why Clemson’s defense adjusted and the ensuing chess match. I’ll show you the example to close out this breakdown, but I first want to show what I feel is the only blemish on an otherwise stellar game from Rees.
At the beginning of the 4th quarter, the Irish find themselves with the ball to start the drive at the Minus-43 yard line and the game tied 23-23. Rees trots out 22 personnel (2 backs, 2 TE’s) and runs zone to the left while faking the reverse to unsuccessfully hold the backside end from making the play. Rees does not call “split-zone” and therefore Tremble does not work back across the formation and the Clemson backside DE can make the play for a loss of 1 yard.
Not a great call, but to make matters worse, 3 plays later after a huge completion to Michael Mayer (whom I plan on doing a piece on why he is such a beast on the field at a later date), the Irish are 1st & 10 again, this time at the Plus-29 yard line. Rees has the same exact personnel in the same exact formation, only this time it is to the right instead of the left. Here he has Tremble come across the formation, fakes the zone, and hands it to Chris Tyree, instead of faking it.
The problem with this, other than just the fact that this is a very elementary sequence that Rees usually avoids, is the following. There was no previous threat of Tremble coming across the formation on the last play like this and this resulted in the antennas going up for the defense. The Irish were fortunate Tyree was able to avoid some tacklers and limit the loss on the play to only 4 yards.
However, for the most part, Rees was able to stay out of these situations and learn from some things earlier in the game. We already took a look at big play to McKinley out of a trips formation set to the boundary. Well, now the situation is that there is 1:14 left in the 4th quarter and the Irish find themselves down 7 points and it is 1st & 10 from the Minus-43 yard line. This time, Rees sets the trips to the wide side of the field, with McKinley still as the single receiver to the boundary.
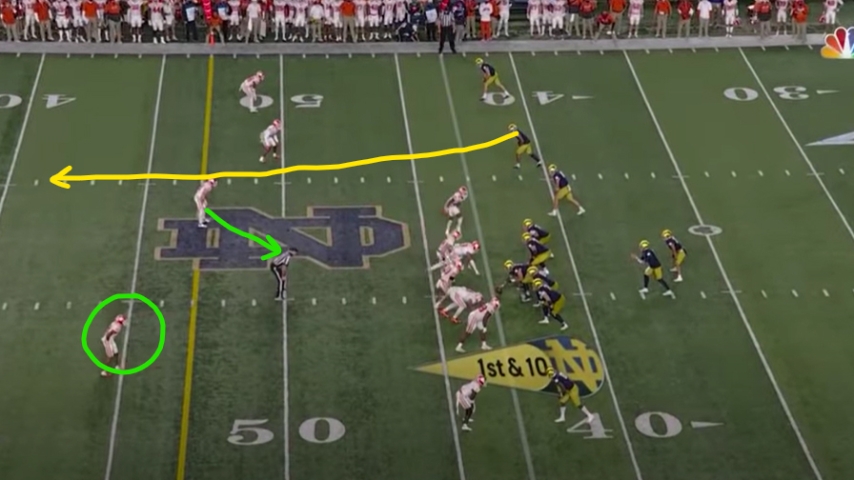
Because of the threat of McKinley and how much he made the Tigers pay earlier, you can see the backside safety (circled in green) off the weak hash, looking to double McKinley. That is great to stop McKinley, but frees up the wide side of the field on the vertical by WR Avery Davis and results in a 53-yard gain down to the 4-yard line.
Beyond the brilliant coverage manipulation, you once again see Williams in great pass pro demeanor, as he strikes both hands through the inside number and rides the defender up the field. Williams is so good in pass protection, I almost forget to highlight him each time - it is just the expected norm at this point. It is also worth noting how Book keeps both hands on the ball and climbs the pocket, all while keeping his eyes down field. Lots of great technique on this one play!
Ultimately, this led to an Irish touchdown and a victory after 2 overtimes. I’ll I dive into the overtimes next time.
To me, this was a great example of Tommy Rees growing as a play-caller. He got away from what seemed to be the initial game plan, but then settled back in and made some great adjustments throughout the game. Be sure to check out the breakdowns for OT and the second Clemson match-up to see what Rees’ plan of attack was for both.